CodeBork | Tales from the Codeface
The coding blog of Alastair Smith, a software developer based in Cambridge, UK. Interested in DevOps, Azure, Kubernetes, .NET Core, and VueJS.
Project maintained by Hosted on GitHub Pages — Theme by mattgraham
Writing for Software Engineers
Well, tonight’s been fun. Sat out in the garden, putting together my toolchain for blogging. Ever since I first used Vue.js in 2018, I’ve been really impressed with the ecosystem, and the automated tooling provided by vue-cli, especially around things like integration with Prettier and Husky (well, Yorkie) to ensure everything is written just so. No arguments over code styles, no cognitive load from parsing inconsistently-formatted codebases, just go code. The slickness of that experience was something I wanted to replicated for my blog, so I didn’t have to worry about, e.g., line lengths, Markdown errors, etc. So, herein lies the tale of my sweet authoring setup.
new-post.sh
This is where it all started: a few nights ago, writing a little Bash script to scaffold a new Jekyll post. I really like the combination of Jekyll and GitHub pages for the Markdown file-centric editing experience, the zero-cost hosting, and the Continuous Deployment from the chosen Pages branch. The only thing missing from the out-of-the-box experience, as far as I’ve found at least, is an easy way to create a new post, and this is the gap I decided to fill.
The script is pretty short: much of the code you see below is the template blog post, and even that could probably be factored out into a separate file rather than a here document.
#!/bin/sh
DATE=`date +%s`
EDITOR=${EDITOR:-`which vim`}
title=${1:-`read -p "What is the title of the blog post? " title; echo $title`}
category=${2:-`read -p "What category should the post be filed under? "category; echo $category`}
file=_posts/$(date -j -f "%s" $DATE +"%Y-%m-%d")-${title// /-}\.md
cat <<POST > $file
---
title: $title
author: Alastair Smith
category: $category
created: $DATE
tags:
 -
---
POST

$EDITOR $file
The script prompts (via variable substitution) for a title and a category, or it
will read them from arguments passed to the script, like
./new-post.sh 'My new blog post' meta. It stashes the current date and time as
a number of seconds, which can then be reformatted for use in the filename, and
interpolated into the created field in the YAML front matter of the post
template.
As I’m on a Mac, and macOS is based on BSD, I found the date munging quite tricky
n comparison with my expectations. It turns out, BSD ships an extended version of
the standard UNIX date command, with subtly wildly different behaviour. In
order to do formatting of dates, one has to pass the -j argument to ensure the
system doesn’t try to set the date, and also specify the existing format of the
date (-f). It then works as normal UNIX date: just pass the date value, and
describe the desired output format.
The script automatically fires up your configured editor, or vim if none is specified. I’ve been using vim for nearly 20 years now, not as my main editor, but as my I’m-in-the-terminal-and-need-to-modify-something editor. For ad hoc use, it works well enough for me, but I’m (still) nowhere near grasping the full power of the thing.
git hooks
As I’m running on Jekyll and GitHub pages, I’m in a Ruby environment. I’m not
super-comfortable in Ruby having only dabbled in the language every now and then,
but I know enough to find my way around (or, at least, know what to search for).
Remembering the value of the precommit hooks of Husky during JavaScript
development, I wanted something similar for the Ruby ecosystem. Enter
overcommit. With a wide range of plugins and
simple extensibility, it was an easy decision to try it out, and easy to install
and configure. I now have pre-commit
hooks
for linting/verifying the YAML files’ syntax, trailing whitespace, and linting
Markdown. Unfortunately,
Markdownlint was trying to lint
the front matter required by Jekyll for post metadata, so a bit more searching
was required to turn up the ignore_front_matter true setting for my .mdlrc.
Overcommit is my belt-and-braces check that my posts and supporting files are all formatted correctly, but it would be pretty annoying if I were relying solely on these hooks. Prettier takes a no-nonsense approach to code formatting, and I wanted that for my blog’s source, so it was time to shift to a parallel universe: Vim plugins.
Vim configuration
Well, whaddaya know, there’s an official Vim plugin for Prettier! This took a bit of experimentation though, I’ll be honest.
Having followed the installation instructions (a simple git clone and update
to my .vimrc—Vim 8 is brilliant), I realised that it had a dependency on the
Prettier CLI itself. Thankfully Homebrew had my back as
always and that speed bump was quickly overcome. It was then a case of
configuring the plugin to automatically run at various points during my editing
flow. I find the .vimrc format somewhat arcane, so here’s a snippet
illustrating the changes I made:
set tw=80
set fo+=t

let g:prettier#autoformat = 1
let g:prettier#autoformat_require_pragma = 0
let g:prettier#exec_cmd_async = 1
" when running at every change you may want to disable quickfix
let g:prettier#quickfix_enabled = 0

autocmd TextChanged,InsertLeave
*.js,*.jsx,*.mjs,*.ts,*.tsx,*.css,*.less,*.scss,*.json,*.graphql,*.md,*.vue,*.yaml,*.html PrettierAsync
The first two lines set up automatic wrapping of all files in vim at 80
characters wide: this is Prettier’s recommended default, and works nicely across
various applications, so I’m happy to apply this as a default width for all Vim
editing. As I understand it, the let lines set properties on the global
prettier objects, specifically to enable auto-formatting, not require the
@prettier tag to be present, to use async formatting (so the editor doesn’t
block whilst auto-formatting and prevent me from typing) and to disable the
“quickfix” feature, which provides an interactive way of resolving issues
Prettier finds. The autocmd line runs the PrettierAsync command when the
text changes, and when the “insert” mode of vim is closed, but only on files
matching the given patterns.
The final change I had to make was to disable Markdownlint’s line-length rule as some lines (such as in the code snippets above) are deliberately longer than the 80-character width, which is also enforced by Vim anyway.
Editing
Having grown to love the split panes feature of the new Windows
Terminal, I wanted this for my writing
and editing flow too. This is very easy to achieve with tmux, so when writing
a blog post, I start up with tmux new -s blog and split my terminal into three
panes: first vertically, then horizontally. This allows me a large vertical
terminal for editing the post in Vim, a smaller terminal for running jekyll serve
and viewing the output, and another smaller terminal for my git operations:
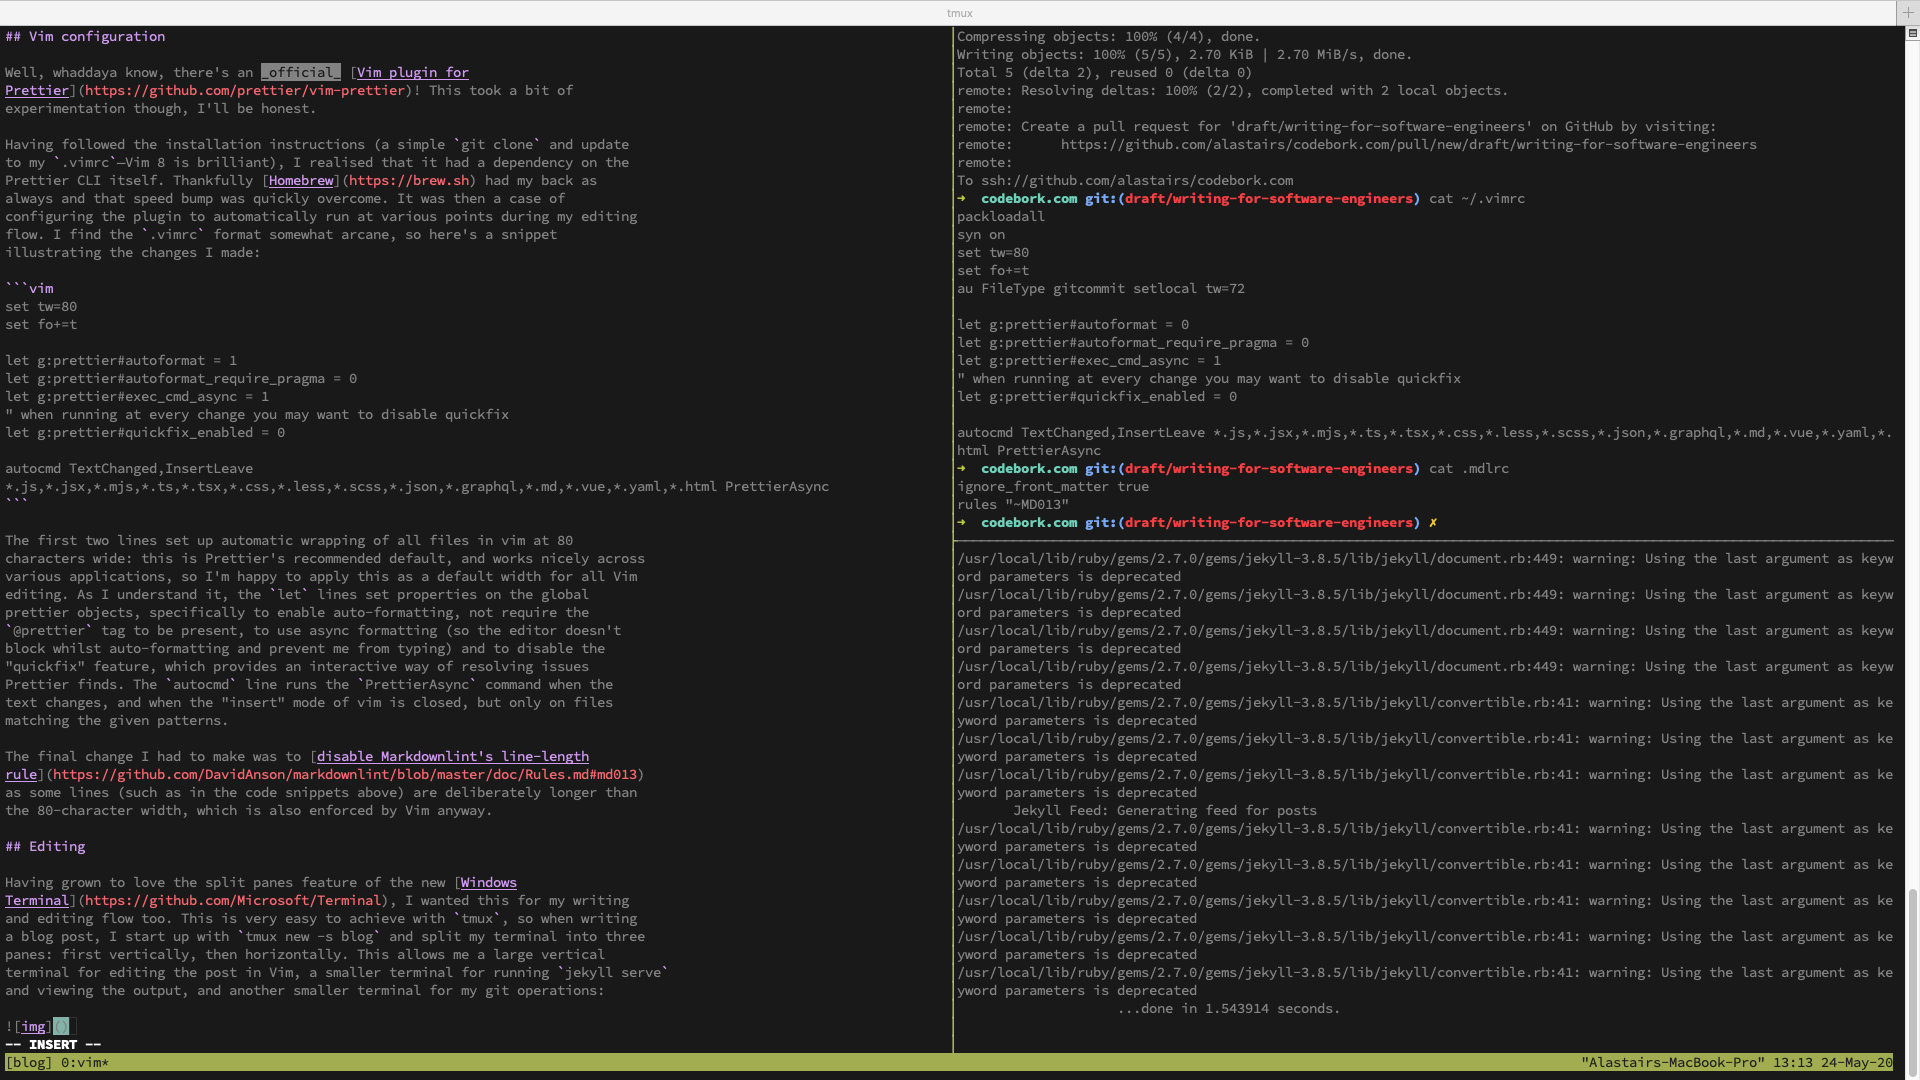
I use the “Later this evening” theme which provides good contrast whilst remaining easy on the eyes. There’s plenty more themes available from lysyi3m on GitHub.
Future work
I now have a nice workflow for writing posts in Markdown, and an easy and cheap
(free!) way of publishing and hosting my blog. I’ve started adopting a branching
approach for my draft posts, which I may build into new-post.sh.