CodeBork | Tales from the Codeface
The coding blog of Alastair Smith, a software developer based in Cambridge, UK. Interested in DevOps, Azure, Kubernetes, .NET Core, and VueJS.
Project maintained by Hosted on GitHub Pages — Theme by mattgraham
Last year, as the pandemic started to bite, Paula put into practice an idea she’d had for a while: a community to support career-changing musicians into the software industry. A professional violinist herself, she completed Makers Academy in 2017, and started Musicoders to provide support to others like her. Over the last 11 months, it’s flourished into a diverse and friendly community of software-developing musicians, and has congratulated approximately five members as they’ve started their new careers in that time.
As a musical software developer myself, I’ve been lurking in the Slack team for
much of its life. Something that has come up a few times of late is the question
of setting up a development environment on Windows: many online bootcamps and
starter programs assume or even require macOS or a Linux distribution such as
Ubuntu, with nary a mention of Windows at all. I thought I’d try to fill that
gap ![]() For the purposes of this guide, I’m assuming you’re running Windows
10, and that it’s version 1903 (March 2019 Update) or higher. Find out how to
check your Windows version
here
and be sure to run Windows Update before you start this tutorial: it’s important
to keep Windows up-to-date to get the latest features and fixes to protect your
machine from The Bad Guys™.
For the purposes of this guide, I’m assuming you’re running Windows
10, and that it’s version 1903 (March 2019 Update) or higher. Find out how to
check your Windows version
here
and be sure to run Windows Update before you start this tutorial: it’s important
to keep Windows up-to-date to get the latest features and fixes to protect your
machine from The Bad Guys™.
Working with the Command Line
Many bootcamps and learn-to-code courses teach some command-line skills, or at
least how to feel comfortable in that environment. Historically, that’s not
something that developers on Windows have enjoyed much, limited as they were by
the tools available at the time, such
cmd.exe and the arcane batch file
programming language. In the
last 10-15 years, however, a new scripting language and shell called
PowerShell has been on the rise and
last year reached version 7. It even runs cross-platform now! Most recently, the
Windows console has had a makeover rewrite, which brings it into the 21st
centry with support for tabs, panes, themes (including image and transparent
backgrounds), and more. Let’s start by setting up your terminal environment to
be somewhere you actually want to be ![]()
Windows Terminal
The easiest way to install Windows Terminal is to download it from the Microsoft Store; this will also ensure it is kept up-to-date. Alternatively, you can download it from GitHub. You can choose to pin Windows Terminal to your Start screen/menu, task bar, or Desktop if you want quick access to it.
When you first run the terminal, it will open a Powershell tab; this will include a start-up message suggesting you “try the new cross-platform PowerShell”. The version of PowerShell running in this tab is “Windows PowerShell”, also known as the “Desktop Edition”. It’s two major versions out of date and has been superseded by PowerShell Core, which we’ll install shortly.
Windows Terminal is highly-customisable. Press Ctrl+, to open its settings file and edit it. The program will update its settings each time you hit Save! The documentation of the program and its settings is good, so be sure to read it once you’ve finished this tutorial to get it working the way you want.
Package Manager
We also want to install and run things easily, so let’s install Scoop, conceptually similar to Homebrew or apt. In your freshly-minted PowerShell tab, run the following snippet to install Scoop, the missing package manager for Windows:
Set-ExecutionPolicy RemoteSigned -Scope CurrentUser
iwr -useb get.scoop.sh | iex
The second line uses a bunch of aliases and other techniques in PowerShell to keep it short, but what it’s doing is downloading a script from get.scoop.sh and executing it. It’s quick and painless to install, and to use.
A useful test of its installation is to install sudo, a handy PowerShell
script that allows you to elevate your privileges when required. It’s
compeletely different from sudo on Linux or macOS, but achieves the exact
same aim.
scoop install sudo
Note about winget Toward the end of 2020, Microsoft announced a new package management tool for Windows which they’re calling
winget. At the time of writing, winget is still in public preview. This means it requires an Insiders account and a bunch of other small-but-irksome hurdles not appropriate for a getting-started guide.
PowerShell Core
As mentioned above, the version of PowerShell you’ve been running so far has
been the Desktop Edition, which is stuck on version 5.1 or so. Let’s get the
most recent version from
GitHub: you’ll want
the file ending win-x64.msi.
PowerShell 7 in particular bundles a neat configuration of PSReadLine, a module that brings more options and power to the command-line experience. Most notably, you’ll see syntax highlighting at the prompt, support for undo/redo, interactive history search with Ctrl+R, and “menu”-style completion with Ctrl+Space. Things you won’t see as a result of this are: incomprehensible error messages, and bad multiline editing.
When you’ve finished installing PowerShell Core, restart Windows Terminal, and you should see a tab open with the newer PowerShell version.
Windows Subsystem for Linux (WSL)
The other thing you’ll most likely need when developing on Windows is the new subsystem for Linux (WSL). This is a brilliant piece of technology that allows you to run a Linux environment from within Windows—and, as we’ll see, with Windows Terminal—without need for spinning up a virtual machine, or dual-booting. The experience is fully integrated, so you can run Linux commands from a Windows environment, and Windows programs from the Linux environment.
It’s a little bit convoluted to set up, but well worth the investment of time. Fire up a new Windows Terminal tab if you don’t have one, and run the following commands:
"Microsoft-Windows-Subsystem-Linux",
"VirtualMachinePlatform" | Enable-WindowsOptionalFeature -Online -NoRestart -All
This enables two features of Windows: WSL itself, and also the Hyper-V virtual machine platform. It’ll likely take a little while to complete and you may need to restart your machine after it completes.
This is also our first bit of real PowerShell code! The comma-delimited syntax
is short-hand syntax for creating an array, which in this case contains just two
items, and this is piped into the PowerShell cmdlet (a lightweight command)
Enable-WindowsOptionalFeature,
supplied with the -Online, -NoRestart, and -All arguments: this ensures we
enable the feature on the running operating system, suppresses reboot, and
installs all dependent features of the named feature. You can think of this like
a loop: on the first iteration we enable the Microsoft-Windows-Subsystem-Linux
feature, and VirtualMachinePlatform on the second.
After you’ve rebooted your machine (if requested), install the Linux kernel update package. This is a one-time installation, and requires no further interactive maintenance or updates.
Finally, you’ll need to install your Linux distribution of choice, which is
again done from the Microsoft Store. I recommend the
most recent version of Ubuntu, 20.04 at the time of writing: Ubuntu is
user-friendly, somewhat ubiquitous, and many courses provide instructions for
working in Ubuntu. Once it is downloaded and installed, you can run it by
searching for the name of your distribution from the Start screen/menu - e.g.
Win+S, Ubuntu. You’ll be prompted to create a username and
password specific to that Linux distribution, and you’ll need to remember that
password for later sudo operations (the real one this time).
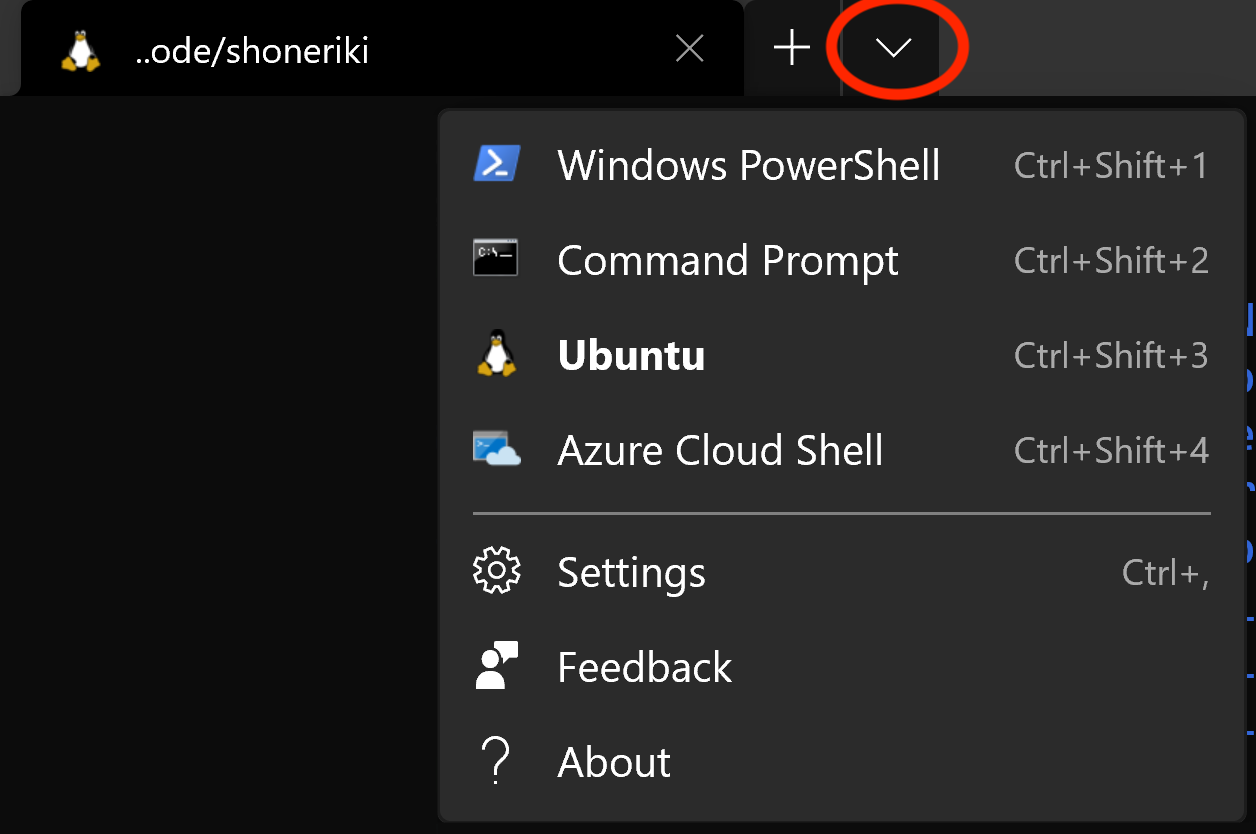
In Windows Terminal, you should now be able to open a new tab into WSL by opening the drop-down menu toward the top of the window and choosing the profile with the pengiun (called tux).
Conclusion
From here, you’re ready to start your adventure writing code on Windows!
Anywhere you read instructions for Linux, just drop into your WSL tab in Windows
Terminal and run the commands you see there ![]()